Install XIV Vault
- Download
xiv-vault-setup-win-x64.exefrom the latest release. - Run it. It installs XIV Vault for your Windows user, with no administrator prompt, and adds it to the Start menu. No .NET install is needed.
- If Windows SmartScreen asks whether to run it, choose More info, then Run anyway. Setup is signed by Hazel Granados; SmartScreen asks about new releases until enough people have downloaded them.
Prefer no installer? The release also has a portable copy, xiv-vault-desktop-win-x64.zip, which doesn't update itself, and the command line, xiv-vault-cli-win-x64.zip. Keep the two in separate folders: Windows treats XIV-Vault.exe and xiv-vault.exe as the same name. Every download can be checked against SHA256SUMS on the release page.
Make your first backup
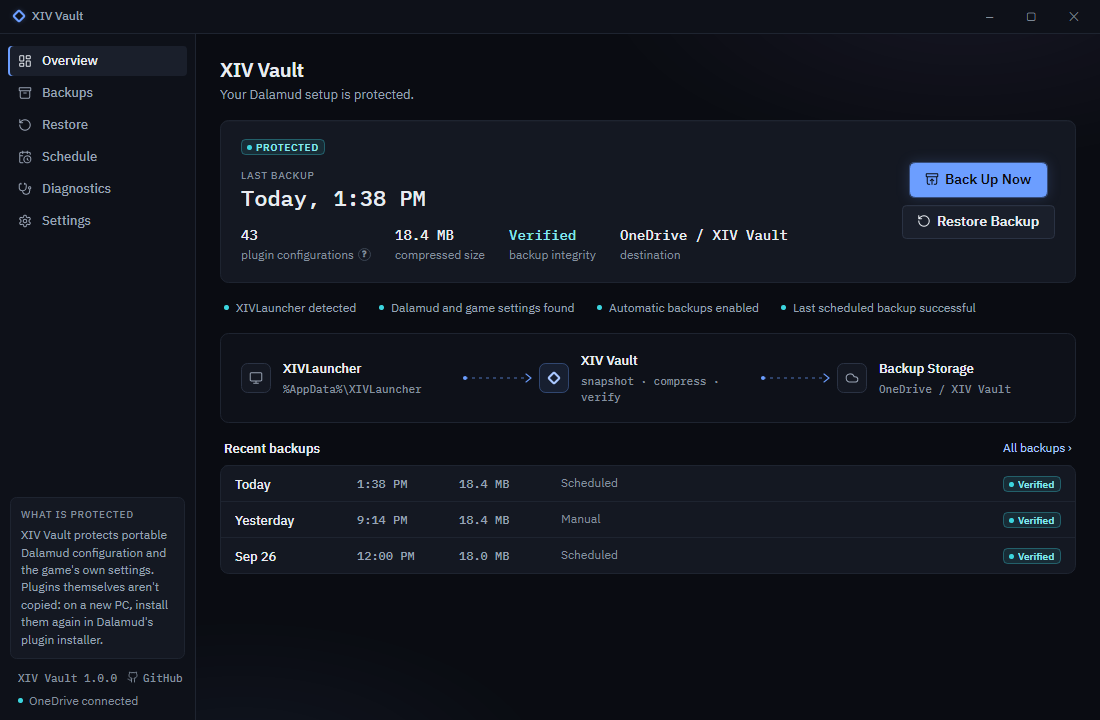
Open XIV Vault. Overview shows whether XIVLauncher was found and whether your setup is protected. Choose Back Up Now.
The backup takes a few seconds. XIV Vault writes it under a temporary name, reads it back, checks every file against its SHA-256, and only then gives it its real name. When it's done, Overview says Backup complete and the backup appears in Recent backups.
 (opens full size)
A backup holds your plugin settings, Dalamud's settings and plugin database, and the game's character and system settings. The full list is on the home page, along with what is never touched.
Choose where backups go
Backups go to OneDrive\XIV Vault when OneDrive is set up, and to Documents\XIV Vault otherwise. To change it, open Settings and choose Choose Folder beside Destination.
A folder that leaves this PC protects you best:
- A folder synced by OneDrive, Dropbox or Google Drive. XIV Vault writes files; your sync client does the rest.
- A NAS or network share.
- An external drive, if you remember to plug it in.
A folder on the same drive as XIVLauncher protects against mistakes, but not against that drive failing. Diagnostics points this out.
Back up automatically
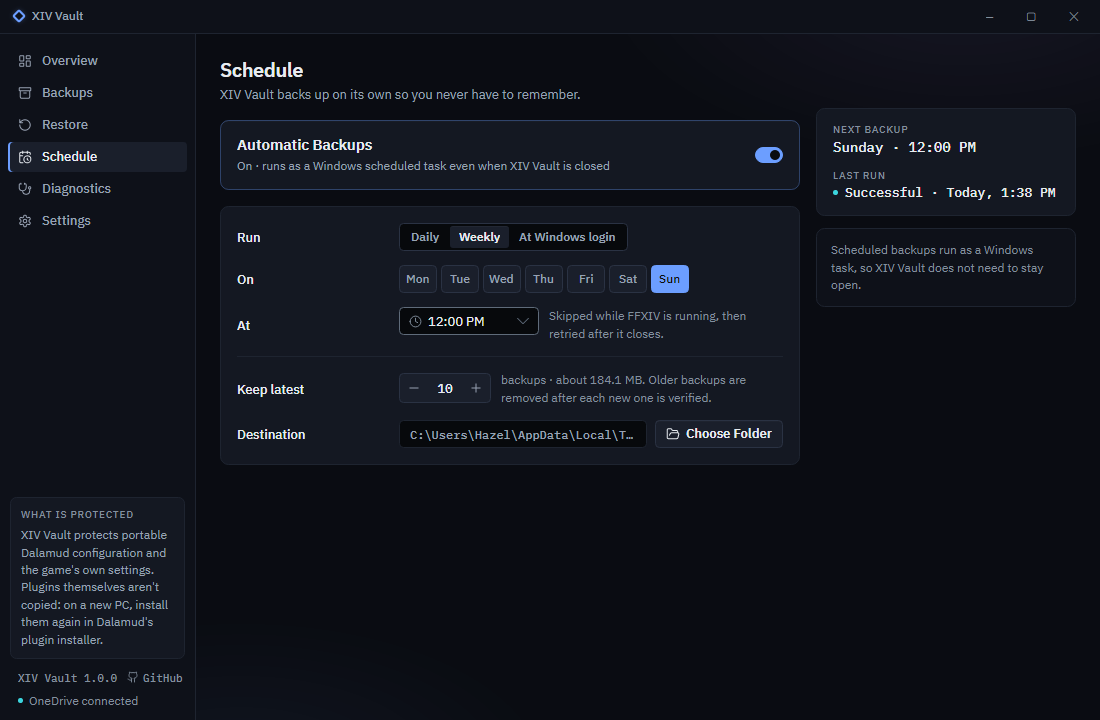
- Open Schedule and turn on Automatic Backups.
- Under Run, choose Daily, Weekly or At Windows login. For weekly backups, pick the days under On.
- Under At, choose the time.
 (opens full size)
Automatic backups run as a Windows scheduled task, XIV Vault Scheduled Backup, so XIV Vault doesn't need to stay open. If the PC was off at the time, the backup runs when it next starts. If FFXIV is running, the backup waits for the game to close, for up to 6 hours, instead of copying files the game has open.
If a scheduled backup fails, Windows shows a notification. Schedule shows the last run as failed, and Diagnostics says why. The notification never shows a path or an error, so it's safe on a stream.
Restore a backup
Close XIVLauncher and FFXIV first: the game rewrites its settings when you log out. Then open Restore. Nothing on disk changes until the last step.
- Choose backup. Pick a backup from the list, or Choose a backup file… to restore one from anywhere. Choose Continue.
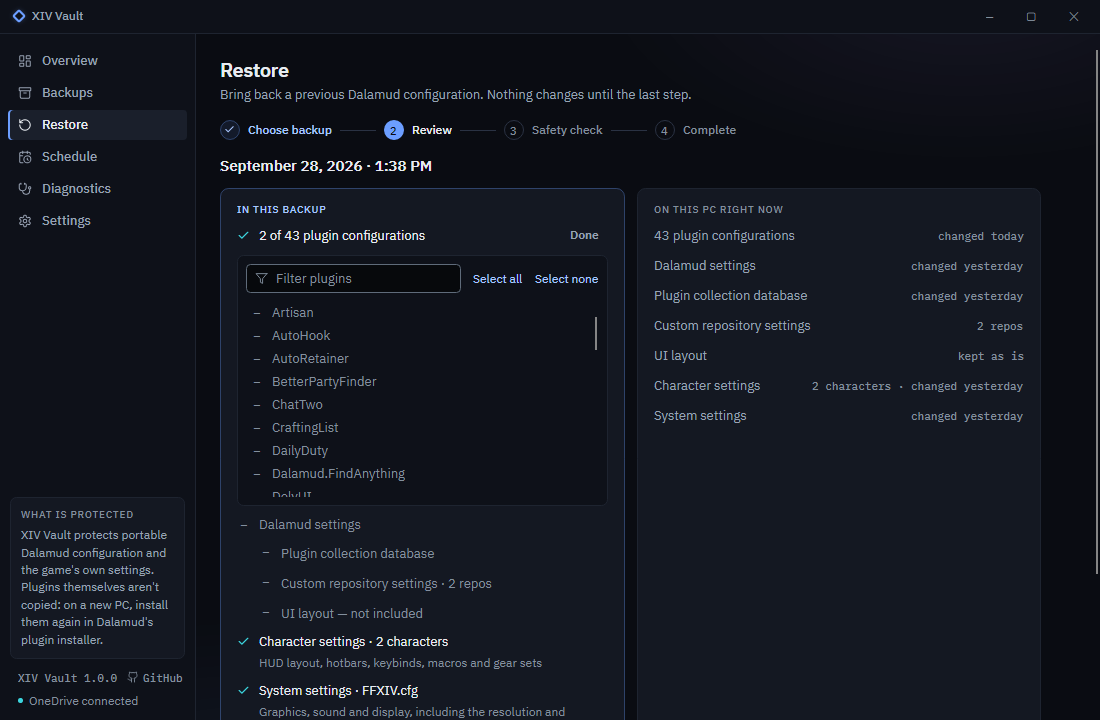
- Review. In this backup shows what the backup holds; On this PC right now shows what is here today. Plugins configured after the backup are listed, because they will return to their earlier settings. Choose Continue.
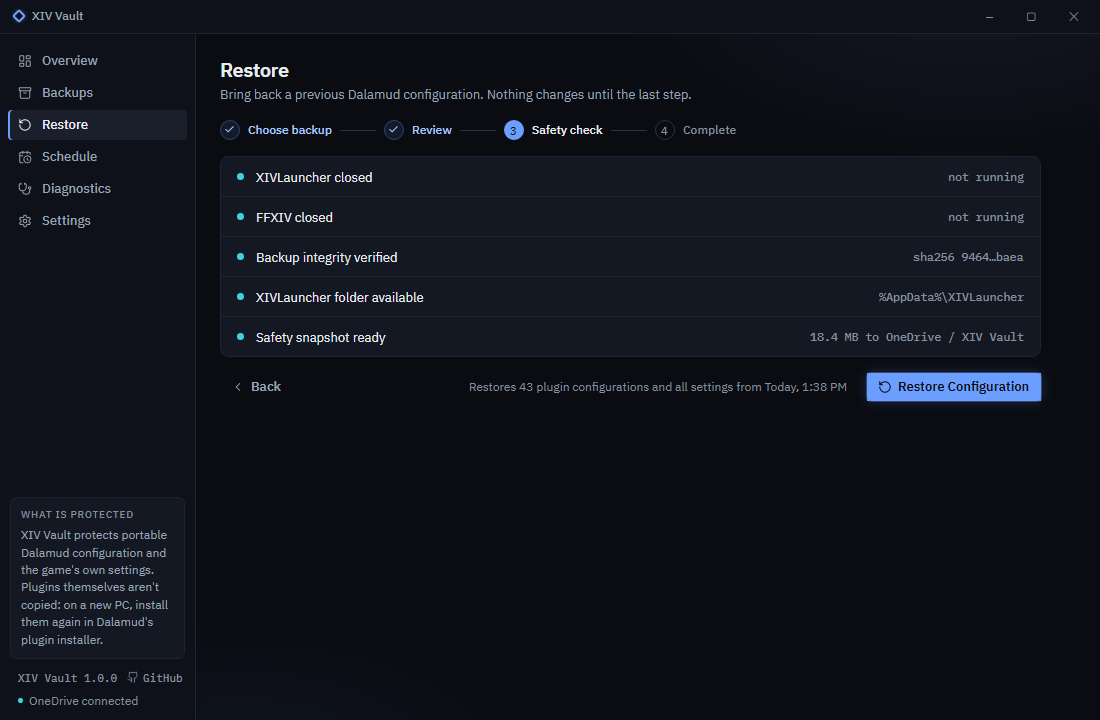
- Safety check. XIV Vault checks that XIVLauncher and FFXIV are closed, verifies the backup, and gets a safety backup ready. Choose Restore Configuration.
- Complete. Open XIVLauncher, or View Backups to see the safety backup.
 (opens full size)
Every restore first takes a safety backup of what is on this PC now. It appears in Backups as a Pre-Restore Safety Backup and restores the same way, so undoing a restore is one more restore. The newest three are kept.
A restore never deletes files the backup doesn't hold. If it fails part-way, XIV Vault puts back every file it changed.
Restore only some settings
Everything is chosen when the review opens, so a full restore is still one click. To restore less, change the choices in the review step:
- Plugins: choose Choose beside the plugin count. Filter by name, use Select all or Select none, and tick the plugins to restore. Choose Done.
- Dalamud settings: Dalamud's own settings, its plugin database, and the UI layout if the backup has it.
- Character settings: each character's HUD layout, hotbars, keybinds, macros and gear sets, with the shared macros and appearance saves.
- System settings:
FFXIV.cfg, with graphics, sound and display. Leave it out when this PC has a different screen.
 (opens full size)
Whatever you leave out stays exactly as it is. The whole backup is still verified, and the safety backup still holds everything a full restore would replace.
Move to a new PC
- On the new PC, install XIVLauncher and start it once.
- Make your backups reachable: sign in to OneDrive or Dropbox, or plug in the drive.
- Install XIV Vault and open it. Backups in
OneDrive\XIV Vaultare found on their own; otherwise choose the folder in Settings, or a backup file in the restore wizard. - Open Restore, choose the newest backup, review it, and restore.
- Open XIVLauncher and log in. The game finds your HUD, hotbars and macros, even if it has never started on this PC.
- Install your plugins again: type
/xlpluginsin the chat to open Dalamud's plugin installer. Dalamud doesn't reinstall them on its own. Each plugin finds its settings when it is installed, and plugins from custom repositories appear because those repositories came back with Dalamud's settings.
With OneDrive Files On-Demand, backups can stay in the cloud. XIV Vault lists them without downloading anything, and downloads only the one you restore, after showing its size.
Look after your backups
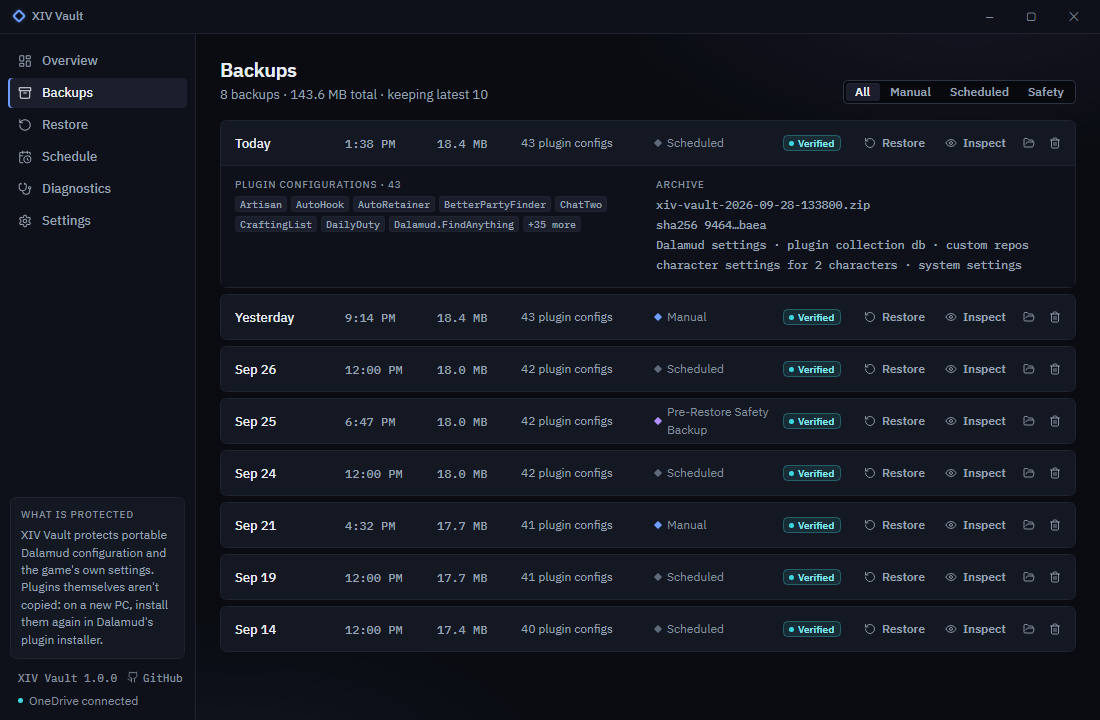
Backups lists every backup with its date, size, plugin count, type and integrity. Filter by Manual, Scheduled or Safety.
- Inspect shows the plugins inside, the archive's name and hash, and which settings it holds.
- Restore starts the restore wizard with that backup.
- The folder button shows the file in Explorer. The bin deletes it, after asking.
 (opens full size)
XIV Vault keeps the latest 10 backups unless you choose another number under Keep latest backups. Older ones are removed only after a new backup is verified. Safety backups are kept separately.
Backups are ordinary ZIP files with a documented format, and open in any ZIP tool.
Settings
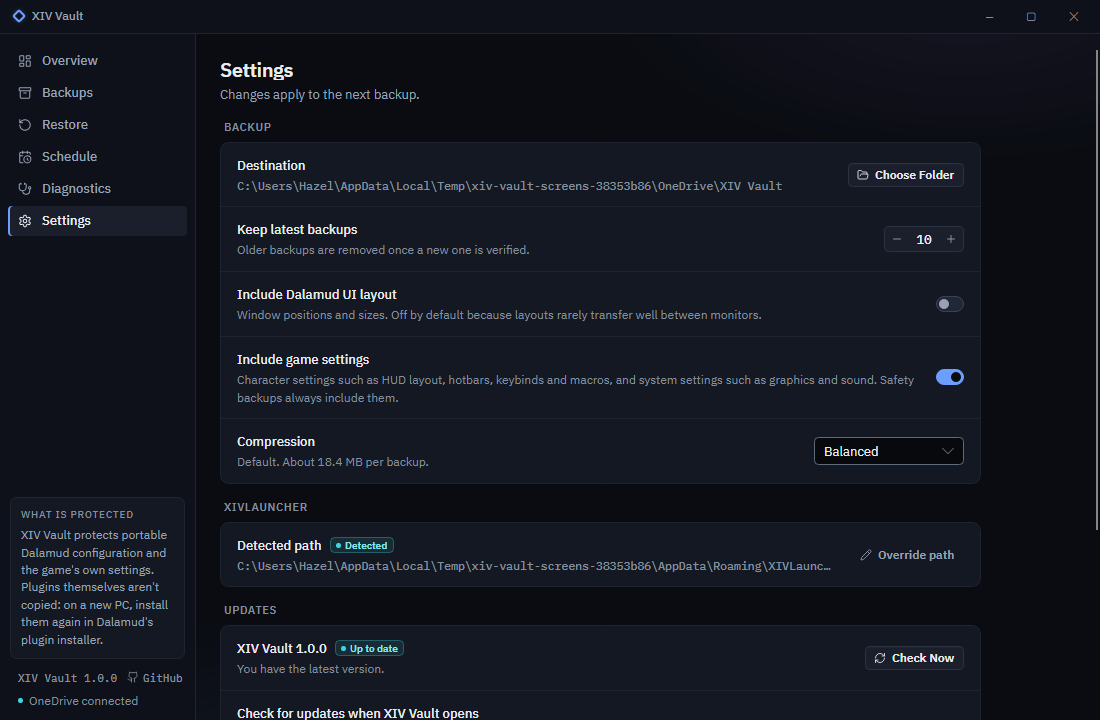
- Destination: the backup folder.
- Keep latest backups: how many backups to keep.
- Include Dalamud UI layout: window positions and sizes. Off at first, because layouts rarely suit another monitor.
- Include game settings: the game's character and system settings. Safety backups hold them either way.
- Compression: Fast, Balanced or Maximum.
- Override path: a different XIVLauncher folder, when XIV Vault doesn't find yours.
- Check for updates when XIV Vault opens: see Updates.
 (opens full size)
Updates
When XIV Vault opens, it checks GitHub's public release list for a newer version. When there is one, the sidebar says so. Open Settings and choose Update and Restart when it suits you; nothing installs on its own.
An update waits while a backup or restore runs, or while another XIV Vault window or a scheduled backup is open. Your settings, backups and schedule carry over.
The update check is the only time XIV Vault uses the network, and it sends nothing about you or your backups. Turn it off with Check for updates when XIV Vault opens. Portable copies never check.
When something goes wrong
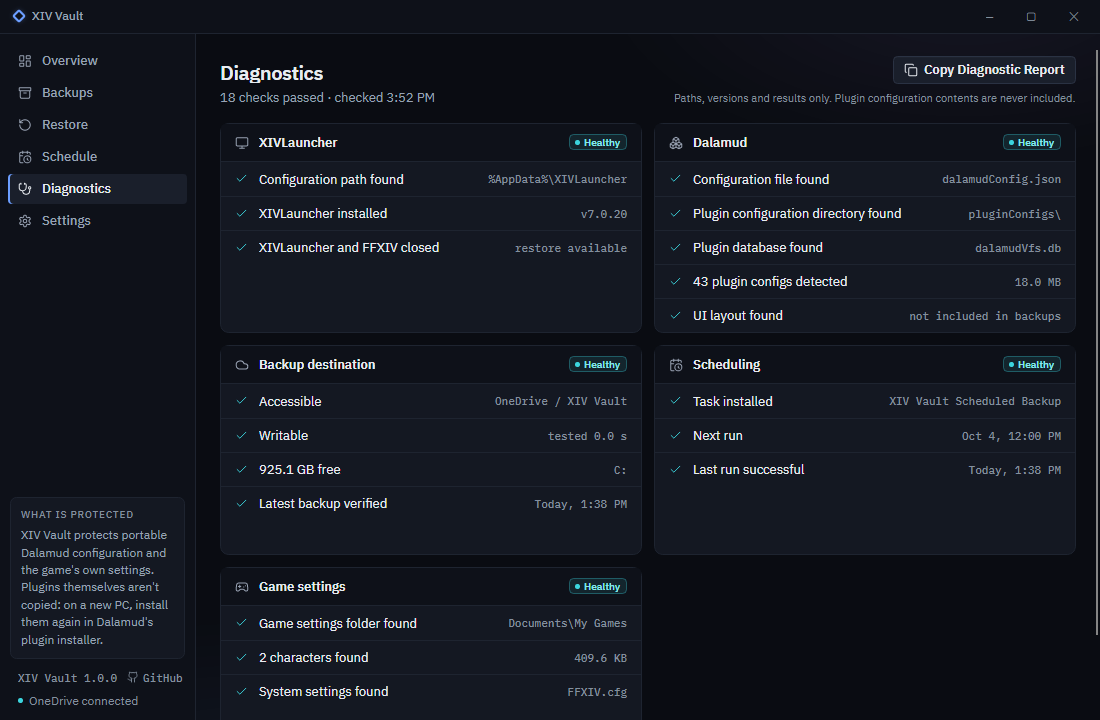
Open Diagnostics. It checks XIVLauncher, Dalamud, the backup folder, scheduling and game settings, and says what needs attention.
 (opens full size)
To report a problem, choose Copy Diagnostic Report and paste it into a new issue. The report holds paths, versions and results only, never your settings or a character's ID. The bug report form asks whether any settings were lost.
The troubleshooting guide covers the common cases.
The command line
xiv-vault does everything the app does. Unzip it into a folder on your PATH.
xiv-vault backup # back up now xiv-vault list # the backups in the backup folder xiv-vault status --json # is the setup protected? xiv-vault doctor --report # a report to paste into an issue xiv-vault restore latest # asks before it changes anything xiv-vault schedule weekly --day Sunday --time 18:30
Commands, options, JSON fields and exit codes stay the same through every 1.x release. The command line reference lists them all.
Uninstall
Open Windows Settings, then Apps, and uninstall XIV Vault. Uninstalling removes its scheduled task. Your backups, and XIV Vault's settings in %LocalAppData%\XIV Vault, stay where they are.